How to Streak Bacteria/ Make Cultures
Lab Description:
Lab: Bacterial Culturing and Streaking for CRISPR Applications
Objective:
This experiment combines bacterial culturing and streaking techniques to prepare and isolate bacterial colonies on LB agar plates. These methods are essential for ensuring a contamination-free environment, which is crucial for conducting CRISPR gene-editing experiments. By culturing bacteria from different sources and isolating colonies through streaking, this lab aims to create a foundation for future CRISPR-related applications by providing a controlled environment to study bacterial growth and manipulate their DNA.
Materials:
- LB Agar Poured Plates
- DH5α Bacterial Stab
- Inoculation Loops
- Q-tip or Cotton Swab
- Sharpie (for labeling)
- Gloves
- Pipette (optional)
- Water (optional)
Rationale:
Culturing and isolating bacteria are key steps in genetic experiments, especially those involving CRISPR technology. Proper streaking techniques allow for the isolation of individual bacterial colonies, which are needed to extract uncontaminated DNA for gene editing. Meanwhile, culturing microorganisms from various sources helps identify growth patterns and ensure that the bacteria used are suitable for CRISPR experiments. Additionally, maintaining sterile conditions is essential for preventing cross-contamination, which can negatively impact experimental results.
Procedure:
Step 1: Plate Preparation
- Warm the Plates:
Remove premade LB agar plates from the fridge and allow them to sit at room temperature for about 30 minutes. - Sterilize the Workspace:
Wear gloves and clean both the gloves and the workspace with alcohol to maintain sterility. - Label the Plates:
Using a Sharpie or marker, label each plate with the sample you are testing, the strain of bacteria, the date, and “LB Agar.” Set aside one plate as a control, leaving it untouched to monitor for contamination.
Step 2: Culturing Bacteria
- Choose Your Samples:
Decide what you want to culture. For example, you could test bacteria from your hand, swab meat, or collect water samples using a pipette. The idea is to culture bacteria, yeast, or fungi from a variety of sources to understand their growth patterns. - Apply the Samples:
Gently rub the cotton swab or Q-tip across the surface of the LB agar plate to transfer the sample. You may divide the plate in half to conduct two different tests on a single plate. - Incubate the Plates:
Set the plates aside and allow them to incubate at room temperature. Be sure to observe the control plate to confirm whether any contamination occurred before applying your samples.
Step 3: Streaking Bacterial Colonies
- Inspect Fresh Plates:
Hold the fresh LB agar plates up to a bright light to ensure they are clear and free from contamination. The surface should appear almost clear, with only a slight tint. - Retrieve Bacterial Sample with Inoculation Loop:
Using an inoculation loop, gently glide the loop across the bacterial colonies in the bacterial stab (DH5α or another bacterial strain). Avoid pressing too hard, as this can break the agar. A milky film should appear on the loop, indicating successful transfer of the bacteria. - Streak the Fresh Plate:
Hold the inoculation loop parallel to the fresh plate and gently rub it across the surface, spreading the bacteria thinly to create streaks. Rotate the loop to use both sides or edges if necessary. The streak lines should be visible when you hold the plate to the light.
Step 4: Final Steps and Incubation
- Store and Incubate the Plates:
Once streaked, allow the plates to incubate either overnight or until colonies appear. To prevent condensation from dripping onto the agar, store the plates upside down. The plates can be stored in the fridge if not used immediately and will typically last 2-3 months.
Results:
After incubation, observe the plates for bacterial or fungal growth. For streaked plates, look for isolated bacterial colonies, which are essential for gene-editing experiments. For cultured plates, compare the growth on the experimental plates with the control plate to ensure no unintended contamination occurred.
Lab Journal:
Day 1: Assuming this does not follow directly from experiment 1, I would have had to prepare agar plates specifically for this experiment. Both halves of this lab use LB agar plates, which are the powder needed to mix with water to create the concentration required for the Petri dishes. If you’d like to know how I made them, please take a look at Experiment 1.
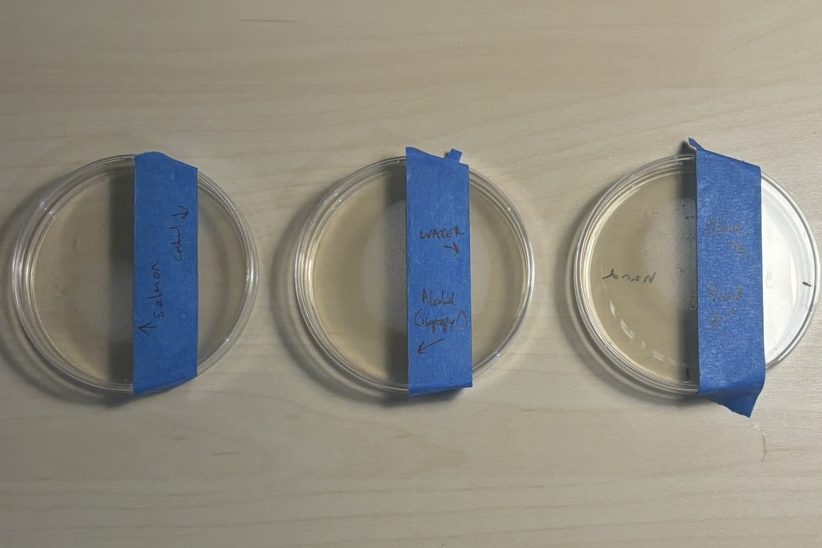
Day 2: After making the necessary Agar plates, the rest is relatively simple. We will first need to follow the first experiment. Here, we are making cultures using bacteria that are growing around the house. A first step would be to find things to streak on the plates, such as my hands, my hands with gloves on, some leftover salmon, water from the sink, etc. Next, we would need to put them on the agar plates. This was on a case-by-case basis; for example, with my hands and gloves, I dragged my finger gently over the agar’s jelly-like surface to avoid breaking it. For the leftover salmon, I used a Q-tip by gliding it across the surface of the smoked salmon in the fridge, then applied the same side of the Q-tip on the agar surface. For the water in the sink, I pipetted some with a 100 microliter pipet and ejected the water onto the agar’s surface. I also added control to make sure that there wasn’t any contamination in my swabbing and one with alcohol(but this one just killed off bacteria and did not yield anything). After, I closed all the agar plate covers and let them sit on my desk.


Day 4: Since day three did not seem to have noticeable results, I skipped that day. two days after swabbing, I noticed some spots were beginning to become prominent, and some growth was occurring. The side with my hand started to have many colonies of bacteria in concentrated places where I dragged my finger. The glove side on the same plate, however, did not yield any results. The side with the salmon did have one or two small colonies that were popping up, and the control had nothing on it. The alcohol side also did not show any results, and the water also had (seemingly) no results.


Day 5: It seems that I had made a mistake by saying that the water did not yield any growth. At the very edge of the plate, where some of the water did indeed leak to, a few smaller colonies were growing. The hand colonies were also increasing rapidly, showing different shades of yellow-colored colonies. The salmon colonies were also changing; however, there was a hint of smokey white in one of them. Other than that, the rest of the colonies were all growing, with the exception of the control, glove, and alcohol halves.


Day 6: Growth was all continuing as usual. The water half of the petri dish was growing colonies in differents spots, but it was still in it’s appropriate side of the dish. The only difference was that the salmon colonies were starting to create mold. This may be because I accidentally swabbed too hard with the Q-tip in the beginning, meaning there was probably a small piece of salmon that got picked up and placed on the agar plate.


Day 7: Today is the last day of the growing colonies. All of the bacteria were growing accordingly, but just larger. At the end of these 7 days, I had come to conclusion that the Alcohol and glove sides of the petri dish yielded no colonies because they were disinfected, which impedes bacteria to grow. To add to that same point, the control also did not grow anything, thus means that the environment and my protocol to disinfect everything in the experiment meant that there wasn’t any contamination.


